| What is hip dysplasia?
What are the symptoms of hip dysplasia? Dogs of all ages are subject to hip dysplasia and the resultant osteoarthritis. In severe cases, puppies as young as five months will begin to show pain and discomfort during and after exercise. The condition will worsen until even normal daily activities are painful. Without intervention, these dogs may eventually be unable to walk. In most cases, however, the symptoms do not begin to show until the middle or later years in the dog's life. The symptoms are similar to those seen with other causes of arthritis in the hip. Dogs often walk or run with an altered gait. They may resist movements that require full extension or flexion of the rear legs. Many times, they run with a 'bunny hopping' gait. They will show stiffness and pain in the rear legs after exercise or first thing in the morning. They may also have difficulty climbing stairs. In milder cases dogs will warm-up out of the stiffness with movement and exercise. Some dogs will limp and many will become less willing to participate in normal daily activities. Many owners attribute the changes to normal aging but after treatment is initiated, they are surprised to see a more normal and pain-free gait return. As the condition progresses, most dogs will lose muscle tone and may even need assistance in getting up. Who gets hip dysplasia? Hip dysplasia can be found in dogs, cats, and humans, but for this article we are concentrating only on dogs. In dogs, it is primarily a disease of large and giant breeds. German Shepherds, Labrador Retrievers, Rottweilers, Great Danes, Golden Retrievers, and Saint Bernards appear to have a higher incidence, however, these are all very popular breeds and may be over represented because of their popularity. On the other hand, sighthounds such as the Greyhound or the Borzoi have a very low incidence of the disease. This disease can occur in medium-sized breeds and rarely in small breeds. It is primarily a disease of purebreds although it can happen in mixed breeds, particularly if it is a cross of two dogs that are prone to developing the disease. What are the risk factors for the development of hip dysplasia? Hip dysplasia is caused by a subluxation in the hip joint. This creates abnormal wear and erosion of the joint and as a result arthritis and pain develop. The disease process is fairly straightforward; the controversy starts when we try to determine what predisposes animals to contracting the disease.
Nutrition: It appears that the amount of calories a dog consumes and when in the dog's life those calories are consumed have the biggest impact on whether or not a dog genetically prone to hip dysplasia will develop the disease. Experimentally, it has been shown that obesity can increase the severity of the disease in genetically susceptible animals. It stands to reason that carrying around extra weight will exacerbate the degeneration of the joints in a dog; including the hip. Dogs that may have been born genetically prone to hip dysplasia and are overweight are therefore at a much higher risk of developing hip dysplasia and eventually osteoarthritis. Another factor that may increase the incidence of hip dysplasia is rapid growth in puppies during the ages from three to ten months. Experimentally, the incidence has been increased in genetically susceptible dogs when they are given free choice food. In one study, Labrador Retriever puppies fed free choice for three years had a much higher incidence of hip dysplasia than their littermates who were fed the same diet but in an amount that was 25% less than that fed to the free-choice group. Feeding a diet that has too much or too little calcium or other minerals can also have a detrimental effect on the development of the hip joint. However, with today's complete and balanced dog foods this has become a rare occurrence. The practice of feeding home-made dog foods is popular with some dog owners. These diets must be carefully monitored for proper nutritional balance; not only for calcium and the other essential minerals but for all nutrients. Exercise: Exercise may be another risk factor. It appears that dogs that are genetically susceptible to the disease may have an increased incidence of disease if they over-exercised at a young age. But at the same time, we know that dogs with large and prominent leg muscle mass are less likely to contract the disease than dogs with small muscle mass. So, exercising and maintaining good muscle mass may actually decrease the incidence of the disease. Moderate exercise that strengthens the gluteal muscles, such as running and swimming, is probably a good idea. Whereas, activities that apply a lot of force to the joint are contraindicated. An example would be jumping activities such as playing Frisbee. How is hip dysplasia diagnosed? The diagnosis of canine hip dysplasia is typically made by combining: clinical signs of arthritis and pain, a complete physical exam, and radiographs (x-rays). If a dog is showing outward signs of arthritis, there are usually easily recognized changes in the joint that can be seen on radiographs. In addition, the veterinarian may even be able to feel looseness in the joint or may be able to elicit pain through extension and flexion of the rear leg. Regardless, the results are straightforward and usually not difficult to interpret. However, about half of the animals that come in for a determination on the health of their hip joints are not showing physical signs, but are intended to be used for breeding. The breeder wants to ensure that the animal is not at great risk for transmitting the disease to his or her offspring. There are two different testing methods that can be performed. The traditional is OFA testing. The other relatively newer technique is the PennHip method. OFA: The method used by the Orthopedic Foundation for Animals (OFA) has been the standard for many years. The OFA was established in 1966, and has become the world's largest all-breed registry. The OFA maintains a database of hip evaluations for hundreds of thousands of dogs. Radiographs are taken by a local veterinarian using specific guidelines and are then submitted to the OFA for evaluation and certification of the dog's hip status. Since the accuracy of radiological diagnosis of hip dysplasia using the OFA technique increases after 24 months of age, the OFA requires that the dog be at least two years of age at the time the radiographs are taken. Because some female dogs experience additional hip subluxation when they are in heat, pregnant or nursing the OFA recommends that the evaluation should not be performed during these times. To get the correct presentation and ensure that the muscles are relaxed, the OFA recommends that the dog be anesthetized for the radiographs. OFA radiologists evaluate the hip joints for congruity, subluxation, the condition of the acetabulum, and the size, shape, and architecture of the femoral head and femoral neck. The radiographs are reviewed by three radiologists and a consensus score is assigned based on the animal's hip conformation relative to other individuals of the same breed and age. The OFA then places the evaluated dogs into one of seven categories. Normal hips are graded as: excellent, good or fair. If the consensus is unclear the dog is graded as borderline dysplastic. And dogs with obvious radiographic signs of hip dysplasia are graded as: mild, moderate, severely dysplastic. Dogs with hips scored as borderline or dysplastic (mild, moderate, severe) are not eligible to receive OFA breeding numbers. The OFA will also provide preliminary evaluations (performed by one OFA radiologist) of dogs younger than 24 months of age to help breeders choose breeding stock. Reliability of the preliminary evaluation is between 70 and 100% depending on the breed.
When the PennHIP DI was compared to the OFA scores for 65 dogs, all dogs scored as mildly, moderately, or severely dysplastic by the OFA method had a DI above 0.3. Hip laxity as measured by the DI is strongly correlated with the future development of osteoarthritis. Hips with a DI below 0.3 rarely develop osteoarthritis. Although hips with a DI above 0.3 are considered "degenerative joint disease susceptible," not all hips with a DI greater than 0.3 will develop osteoarthritis. It is known that some hips with radiographically apparent laxity do not develop osteoarthritis. A means of differentiating lax hips that develop osteoarthritis from those that will not is important in developing a prognosis and making treatment or breeding recommendations. In one study, the DI obtained from dogs at four months of age was a good predictor of later osteoarthritis, though the 6 and 12-month indices were more accurate. The PennHIP method has gained popularity and more and more veterinarians are becoming certified. How is hip dysplasia treated surgically? There are several surgical procedures available to treat hip dysplasia depending on the dog's age, body size, and the severity of the hip joint's degeneration. Triple Pelvic Osteotomy (TPO): TPO is a procedure used in young dogs usually less than 10 months of age that have radiographs that show severe hip laxity, but have not developed damage to the joints. The procedure involves surgically breaking the pelvic bones and realigning the femoral head and acetabulum restoring the weight-bearing surface area and correcting femoral head subluxation. This is a major surgery and is expensive, but the surgery has been very successful on animals that meet the requirements. Juvenile Pubic Symphysiodesis: A less invasive surgery for treating hip dysplasia is called Juvenile Pubic Symphysiodesis. This surgery prematurely fuses two pelvic bones together, allowing the other pelvic bones to develop normally. This changes the angle of the hips and improves the articulation of this joint, lessening the likelihood of osteoarthritis. Early diagnosis is critical, since the procedure must be done before 20 weeks of age, preferably 16 weeks, and before any signs of arthritis are evident. Total Hip Replacement: This may be the best surgical option for dogs that have degenerative joint disease as a result of chronic hip dysplasia. Total hip replacement is a procedure that can produce a functionally normal joint, eliminate degenerative changes, and alleviate joint pain. The procedure involves the removal of the existing joint and replacing it with an artificial joint or prosthesis. To be a candidate for this procedure, the animal must be skeletally mature. With the new micro-prosthetics there is no minimum size limit. In addition, there is no maximum size limit. If both hips need to be replaced, there is a three-month period of rest recommended between the surgeries. As with the TPO surgery, this is an expensive procedure but it produces very good results. Most dogs return to a near normal level of activity without pain. Femoral Head and Neck Excision: Femoral head and neck excision is a procedure in which the head of the femur is surgically removed and a fibrous pseudo-joint replaces the hip. This procedure is considered a salvage procedure and is used in cases where degenerative joint disease has occurred and total hip replacement is not feasible or if the expense of a total hip replacement is prohibitive. The resulting pseudo-joint will, in most cases, be free from pain and allow the animal to increase his activity, however, full range of motion and joint stability are decreased. For best results, the patient should weigh less than 40 pounds; however, the procedure may be performed on larger dogs. How is hip dysplasia treated medically?
Medical management of hip dysplasia and osteoarthritis has greatly improved thanks to the introduction and approval of several new drugs. Because hip dysplasia is primarily an inherited condition, there are no products on the market that prevent its development. Through proper diet, exercise, supplements, anti-inflammatories, and pain relief, you may be able to decrease the progression of degenerative joint disease, but the looseness in the joint or bony changes will not change significantly. Because of the high cost involved with corrective surgeries, medical management is many times the only realistic option for pet owners. Medical management is multifaceted. For the best results, several of the following modalities should be instituted.
Exercise: Exercise is equally important in losing and/or maintaining the appropriate weight. Exercise that provides good range of motion and muscle building as well as limiting wear and tear on the joints is best. Leash walks, swimming, walking on treadmills, and slow jogging are excellent low-impact exercises. Bear in mind that an exercise program needs to be individualized for each dog based on the severity of the osteoarthritis, his weight, age, and physical condition. In general, too little exercise can be more detrimental than too much, however the wrong type of exercise can actually cause harm. While playing Frisbee can be very enjoyable and fun for the dog, it is extremely hard on his joints. Remember, it is important to exercise daily; only exercising on weekends, for example, may cause more harm than good. Regular exercise in shorter sessions is always better than long work-outs on weekends. Warming the muscles prior to exercise and following exercise with a "warm-down" period are beneficial. Consult with your veterinarian regarding an exercise program appropriate for your dog. Warmth and good sleeping areas: Most people with arthritis find that the symptoms tend to worsen in cold, damp weather. Keeping your pet warm, may help him be more comfortable. A pet sweater will help keep joints warmer. In addition, you may want to consider keeping the temperature in your home a little warmer. Providing an orthopedic foam bed helps many dogs with arthritis. Beds with dome-shaped, orthopedic foam distribute weight evenly and reduce pressure on joints. They are also much easier for the pet to get out of. Place the bed in a warm spot away from drafts. Massage and physical therapy: Your veterinarian or the veterinary staff can show you how to perform physical therapy and massage on your dog to help relax stiff muscles and promote a good range of motion in the joints. Remember, your dog is in pain, so start slowly and build trust. Begin by petting the area and work up to gently kneading the muscles around the joint with your fingertips using small, circular motions. Gradually work your way out to the surrounding muscles. Moist heat may also be beneficial.
Oral Supplements Glucosamine and Chondroitin: Glucosamine and chondroitin are two compounds that have been widely used to help manage osteoarthritis in both animals and humans. Glucosamine is the major sugar found in glycosaminoglycans and hyaluronate, which are important building blocks in the synthesis and maintenance of joint cartilage in the joint. Chondroitin enhances the synthesis of glycosaminoglycans and inhibits damaging enzymes within the joint. When a dog has hip dysplasia, the joint wears abnormally and the protective cartilage on the surface of the joint gets worn away and the resultant bone-to-bone contact creates pain. Glucosamine and chondroitin give the cartilage-forming cells (chondrocytes) the building blocks they need to synthesize new cartilage and to repair the existing damaged cartilage. These products are not painkillers; they work by actually healing the damage that has been done. These products generally take at least six weeks to begin to help heal the cartilage and most animals need to be maintained on these products the rest of their lives. These products are safe and show very few side effects. There are many different glucosamine/chondroitin products on the market, but they are not all created equal. Drs. Foster and Smith's line of Joint Care products or Cosequin are recommended. Perna Mussels: Perna canaliculus, or green-lipped mussel, is an edible shellfish found off the shores of New Zealand. The soft tissue is separated from the shell, washed several times, frozen, and freeze-dried. It is then processed into a fine powder and added to joint care products. It is made up of 61% protein, 13% carbohydrates, 12% glycosaminoglycans (GAGs-an important component of connective tissue), 5% lipids, 5% minerals, and 4% water. It also contains glucosamine, a GAG precursor and one of the building blocks of cartilage. Glucosamine and GAGs are the compounds in the mussel believed to contribute to its beneficial effects. Omega-3 Fatty Acids: Omega-3 fatty acids are often used for the management of the signs of atopy in dogs. Because of their anti-inflammatory properties, some have advocated their use in dogs with osteoarthritis.
Duralactin: Duralactin is a patented product obtained from the milk of grass-fed cows. It has been studied and marketed for the management of musculoskeletal disorders in dogs. This compound has anti-inflammatory properties and is available without a prescription. It may be used as a primary supportive nutritional aid to help manage inflammation or in conjunction with non-steroidal anti-inflammatory drugs (NSAIDs) or corticosteroids. Methyl-sulfonyl-methane (MSM): MSM is a natural, sulfur-containing compound produced by kelp. Sulfur is necessary for the production of collagen, glucosamine, and chondroitin. MSM is reported to enhance the structural integrity of connective tissue, and help reduce scar tissue by altering components that contribute to scar formation. MSM has been promoted as having powerful anti-inflammatory and pain reducing properties, and is thought to work by blocking the pain perception in certain nerve fibers before the pain impulse reaches the brain. S-Adenosyl-L-methionine (SAMe, Denosyl SD4): A recent product, Denosyl SD4, has been advocated for the management of osteoarthritis in people. The efficacy of this product for the management of osteoarthritis in animals has not been fully determined; however it is being used as a treatment for liver disease in dogs and cats. It has both anti-inflammatory and pain relieving properties. Injectable Disease-Modifying Osteoarthritis Agents: Polysulfated Glycosaminoglycan (Adequan): Adequan is a product that is administered as an intramuscular injection. A series of shots are given over four weeks and very often this product produces favorable results. This product helps prevent the breakdown of cartilage and may help with the synthesis of new cartilage. The complete mechanism of action of this product is not completely understood, but appears to work on several different areas in cartilage protection and synthesis. The cost and the inconvenience of twice weekly injections are a deterrent to some owners, especially with the ease of giving oral glucosamine products. Hyaluronic Acid (Legend): Hyaluronic acid is an important component of joint fluid. Including it in the management of osteoarthritis may protect the joint by increasing the viscosity of the joint fluid, reducing inflammation and scavenging free radicals. Most of the research on hyaluronic acid has been done in people and horses, but it may also be beneficial in dogs. Because this product is injected directly into the joint and it is not labeled for dogs its use must be under the direct supervision of a veterinarian. Anti-inflammatory Drugs:
Carprofen (Rimadyl), etodolac (EtoGesic), deracoxib (Deramaxx), firocoxib (Previcox), tepoxalin (Zubrin) meloxicam (Metacam): These are non-steroidal anti-inflammatory drugs (NSAIDs) developed for use in dogs with osteoarthritis. They are very effective painkillers that also reduce inflammation. They are prescription products and because of potential side effects, careful adherence to dosing quantity and frequency must be followed. The manufacturers recommend that patients taking these medications have a thorough physical examination along with appropriate blood-work (especially tests for liver health) performed before starting these medications. In addition, patients taking these products should be periodically monitored to make sure that they are tolerating the medication. These products are often used initially with glucosamine therapy and then as the glucosamine product begins to work, the NSAID dose may be reduced or even eliminated. NSAID's (including aspirin) should never be combined unless directed by your veterinarian. Acetaminophen (Tylenol), and ibuprofen (Advil) have many potential side effects and are not recommended without veterinary guidance. Buffered Aspirin: Buffered aspirin is also an anti-inflammatory and painkiller used in dogs. It can be used along with glucosamine/chondroitin products. With all aspirin products used in dogs, there is a risk of intestinal upset or in rare cases, gastric ulceration. Using buffered aspirin formulated for dogs makes dosage and administration much easier. Do NOT give your cat aspirin unless prescribed by your veterinarian. Corticosteroids: Corticosteroids have been used for many years to treat the pain and inflammation associated with osteoarthritis, however, their use is controversial. Corticosteroids act as a potent anti-inflammatory, but unfortunately, they have many undesirable short and long-term side effects. Because of these side effects and the advent of newer, more specific drugs, corticosteroids are generally only used in older animals with flare-ups where all other pain control products have failed. Corticosteroids are a prescription product and come in both a pill and injectable form.
How do we prevent hip dysplasia? When it comes to preventing hip dysplasia, there is only one thing that researchers agree on; selective breeding is crucial. We know that through selectively breeding animals with certified hips, we can significantly reduce the incidence of hip dysplasia. We also know that we can increase the incidence of hip dysplasia if we choose to use dysplastic animals for breeding. Breeding two animals with excellent hips does not guarantee that all of the offspring will be free of hip dysplasia, but there will be a much lower incidence than if we breed two animals with fair or poor hips. If we only bred animals with excellent hips it would not take long to make hip dysplasia a rare occurrence. If owners insisted on only purchasing an animal that had parents and grandparents with certified good or excellent hips, or if breeders only bred these excellent animals, then the majority of the problems caused by hip dysplasia would be eliminated. For someone looking to purchase a dog, the best way to lower the possibility of getting an animal that develops hip dysplasia is to examine the incidence of hip dysplasia in the litter's lineage. It is best to examine the parents and grandparents out to three or four generations. There are many different theories on how to prevent the progression of hip dysplasia. As discussed earlier, poor nutrition, inadequate or improper exercise, and increased body weight may all contribute to the severity of osteoarthritis after the hip dysplasia has developed. Following solid recommendations for exercise and nutrition may help, but will never come close to controlling or eliminating the disease if stricter requirements for certified hips are not instituted or demanded. Summary Hip dysplasia is a widespread condition that primarily affects large and giant breeds of dogs. There is a strong genetic link between parents that have hip dysplasia and the incidence in their offspring. There are probably other factors that contribute to the severity of the disease. Osteoarthritis of the hip is the result of the degeneration of the joint due to a laxity caused by hip dysplasia. Surgical and medical treatments are targeted to prevent and treat the resulting osteoarthritis. The best way to prevent hip dysplasia is through selection of offspring whose parents and grandparents have been certified to have excellent hip conformation. |
Wednesday, December 23, 2009
Hip Dysplasia in Dogs
 To understand hip dysplasia we must have a basic understanding of the joint that is being affected. The hip joint forms the attachment of the hind leg to the body and is a ball and socket joint. The ball portion is the head of the femur while the socket (acetabulum) is located on the pelvis. In a normal joint the ball rotates freely within the socket. To facilitate movement the bones are shaped to perfectly match each other; with the socket surrounding the ball. To strengthen the joint, the two bones are held together by a strong ligament. The ligament attaches the femoral head directly to the acetabulum. Also, the joint capsule, which is a very strong band of connective
  Hip dysplasia is associated with abnormal joint structure and a laxity of the muscles, connective tissue, and ligaments that would normally support the joint. As joint laxity develops, the articular surfaces of the two bones lose contact with each other. This separation of the two bones within the joint is called a


Wednesday, November 18, 2009
Hairless Rodents
Rats and Mice
RATS
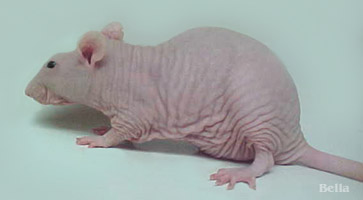
There are two basic types of hairless rats, true hairless and 'patchwork' hairless.
True hairless rats have no fur at all on their bodies and usually no whiskers either. Sometimes they have fur as pups which falls out by the time they are 2-3 months old. There are many different genetic strains of true hairless, most if not all of which have come from laboratories, where they are used extensively for medical research. They are missing a part of their immune system called the thymus, which makes them susceptible to disease and allergies. Depending on which strain they are they can be prone to tumors, eye and respiratory infections, heart or kidney disease, diabetes or skin problems. The average lifespan of true hairless rats is 9-18 months old.
As it is impossible to tell what strain a true hairless rat is without genetic testing, it is important to obtain true hairless rats from reputable breeders who can provide a pedigree. Breeders are working on stronger stains of true hairless rats through out-crossing with healthy furred rats. Hairless females with few exceptions do not make good breeders. They generally do not lactate at all or enough to support a litter, and cannibalism or abandonment is common. To produce true hairless pups, breeders will mate a hairless male (homozygous) to a furred hairless carrier female (heterozygous for hairless). Half of the offspring produced should be hairless, the other half will be furred hairless carriers.
Patchwork hairless rats maintain a certain amount of short, soft fur on their bodies and patches where they are bald. The fur will periodically fall out and grow back in throughout the rat's life in different patterns. They usually maintain whiskers though they are generally brittle and curly. While they are more prone to allergies, they are hardier than the true hairless rats and should live an average lifespan. The females also have no problems reproducing or raising litters. There are three strains of patchwork hairless rats:
1) Double rex: produced from two rex-coated parents (ReRe). Different from the other two strains as they tend to keep some fur on the face, head, feet and ankles while maintaining a mostly hairless body. If bred to a normal-coated rat they will produce rex-coated pups. If bred to a rex or velveteen-coated rat they will produce double rex pups.
2) Double Velveteen: produced from two velveteen-coated parents (CuCu). If bred with a normal-coated rat will produce velveteen-coated pups. If bred to a velveteen or rex-coated rat they will produce double velveteen pups.
3) Double velveteen/Double rex: produced from one double rex-coated parent and one double velveteen-coated parent (CuCuReRe). If bred to a normal-coated rat they will produce rex-coated and/or velveteen-coated pups.
Caring for a true or patchwork hairless rat is very similar to a furred rat. With less fur they need to maintain a higher body temperature which quickens their metabolism. They will eat and drink more than furred rats, and should be given some extra protein in their diets. A multi-vitamin formulated for rats can also be put into ther drinking water once a week. To help them stay warm a heating pad on LOW can be place under one third of their cage floor (make sure wires are out of range). Rats are social and should have a companion, but with true hairless rats I suggest keeping hairless with hairless as they will be more gentle with each other. Hairless rats can get scratched easily, and these should be tended to quickly with a safe topical cream. To further prevent scratches, use toys with no sharp edges, make sure hideaways have ample entry and exit space and that cages are coated wire, not just metal. Use a soft bedding instead of woodchips or corn cob which can irritate and itch. There are many on the market made from recycled newspaper, etc. Try to keep hairless rats away from other pets and put an air filter in the room to cut down on the chances of them developing allergies. It is very important to make sure the cage is clean and dry. Never keep your hairless rats by a window or in direct sunlight as they sun-burn easily.
MICE
There are two main types of hairless mice, nude mice and fuzzy mice.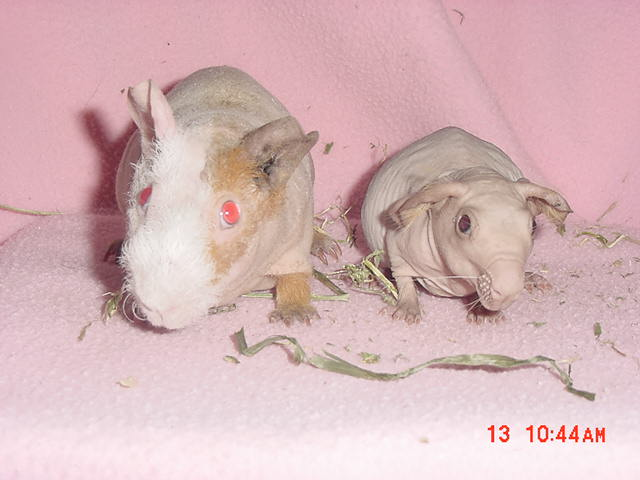
Nude mice are more commonly found than the fuzzy variety. They have no fur at all and usually have no whiskers. The claws need to be clipped more often as they grow very quickly in some strains. They originate from laboratories where they have been used extensively in medical research since the late 1920's. Like hairless rats, they are also missing the part of their immune system called the thymus, making them very susceptible to disease and allergies. There are many different strains of nude mice, some of which are prone to a variety of ailments including neurological problems and diseases of the major organs. Even under laboratory conditions, nude mice usually do not live an average lifespan.
Most of the nude mice in the pet trade are laboratory surplus animals distributed to brokers and pet stores. Unfortunately with their compromised immune systems, these mice tend to pick up illnesses and not survive very long. Try to purchase nude mice from a reputable breeder which can give you a pedigree. Some breeders have succeeded in producing stronger nude bloodlines more suitable as pets. Nude female mice tend to not be good breeders, as they produce small litters and have a very short span of fertility (between 2.5 months to 7 months old). They sometimes do not lactate at all or enough to raise their litters, and abandonment or cannibalism is common. Nude mice should be bred by breeding a nude male (homozygous) to a furred nude carrier female (heterozygous for nude). Half of the pups produced will be nude and the other half will be furred nude carriers.
Fuzzy mice are more difficult to find as only a handful of breeders have them. There are a few strains of fuzzy mice but they generally have a fine covering of short soft fur which may fall out and grow back in periodically in different patterns. They may or may not have whiskers. Some are mostly bald with patches of fur on the head, shoulders and/or feet. The fuzzy mouse strains seem to be hardier than the nudes, although still more prone to allergies than regular mice.
Whether nude or fuzzy, hairless mice have higher metabolisms to help keep themselves warm. Extra protein should be added into their diets, and a multi-vitamin formulated for mice can be put into their water once a week. To help prevent scratches, it is best to keep hairless mice in an aquarium with a mesh screen lid. Toys should not have pointed aspects and hideaways should have ample exit and entry space. Avoid using woodchips as bedding, instead use a soft alternative bedding. It is very important to keep the cage clean, warm and dry. A heating pad on LOW under one third of the tank will help with warmth. An air filter in the room your mice are kept in will also help prevent allergies. Do not keep hairless mice near a window or in direct sunlight, as they are very vulnerable to sunburn.
Guinea Pigs
There are two types of hairless guinea pigs, Baldwins (above right) and skinny pigs (above left).
Baldwins are a rarer breed of guinea pig and not yet widely available in the pet trade. They are born with fur which falls out completely by 6-9 weeks of age. Usually they have no whiskers. Baldwins tend to be smaller than the average guinea pig, and are also more fragile. They seem to have lowered immune systems, and breeders are working to establish hardier lines of Baldwins more suitable as pets.
Unlike some other completely hairless rodents, female Baldwins show no problems in bearing and raising litters. This puts less limits on a breeder when trying to breed Baldwin offspring. Breeding two Baldwin parents (homozygous) will produce all Baldwin young. Breeding a Baldwin to a standard-coated guinea pig will produce half standard-coated young and half standard-coated Baldwin carriers (heterozygous for Baldwin). Breeding a Baldwin to a standard-coated Baldwin carrier will produce half Baldwin young and half standard-coated Baldwin carriers.
Skinny pigs are much more common than Baldwins and can often be found at pet stores. They have coarse fur on their heads, feet and ankles, and the rest of the body is bald or covered in very short fine fur. The whiskers are short and curled. Skinny pigs were first introduced in 1976 by the Charles River Laboratory in Canada, and initially they were not a very hardy breed. They are still being widely used for medical research. Breeders have worked extensively with skinny pigs through out-crossing with coated guinea pigs. Most of the lines available are strong and healthy and can expect a similar lifespan as regular guinea pigs. It is still advisable to purchase skinny pigs from reputable breeders over pet stores.
Female skinny pigs also seem to have no problems with bearing and raising litters. Breeding two skinny pigs (homozygous) together will produce all skinny pig young. Breeding a skinny pig to a standard-coated guinea pig will produce half standard-coated guinea pigs and half standard-coated skinny carriers (heterozygous for skinny pig). Breeding a skinny pig to a standard-coated skinny carrier will produce half skinny pig young and half standard-coated skinny carriers.
Whether Baldwin or skinny pig, hairless guinea pigs have a higher metabolism to help keep warm than their furred counterparts. They will tend to eat and drink more, this is completely normal. Try to keep hay contained in a hay net so it will not itch and irritate their skin. A multi-vitamin formulated for guinea pigs can be added to their drinking water once a week. Do not use woodchips as bedding but instead a soft alternative bedding. Purchase a cage with a solid bottom and coated wire. A heating pad on LOW placed under one fourth of the cage will help keep them warm. Provide a nest box (not directly over heated area) with ample exit and entry space which they can retreat to. This will also help keep them warm. It is important to keep their cage clean and dry. Do not keep hairless guinea pigs near windows or in direct sunlight as they are very susceptible to sunburn.

Syrian Hamsters
Hairless Syrian hamsters are quite rare in the pet trade and are sometimes referred to as 'alien' hamsters. They have no fur at all on their bodies, and usually do not have whiskers. They have lowered immune systems which makes them more susceptible to disease, and they often will not live an average lifespan though it is possible. Female hairless hamsters do not make good breeders, as they do not lactate at all or enough to sustain their litter. Abandonment or cannibalism is common in these cases. Hairless hamsters should be produced by breeding a hairless male (homozygous) to a furred hairless carrier female (heterozygous for hairless). Half of the pups will be hairless and the other half will be furred hairless carriers.
Care for a hairless hamster is similar to a regular Syrian hamster. To help keep warm they have higher metabolisms and will require some extra protein in their diets. A multi-vitamin formulated for hamsters can be put in their drinking water once a week. An aquarium with a secured mesh lid is best to help prevent escapes and scratches. Toys should not have any pointed parts and hideaways should have ample exit and entry room. Do not use woodchips as bedding but a soft alternative bedding instead. A heating pad on LOW under one third of the tank will also help keep them warm. It is very important to keep the enclosure clean and dry. Do not keep hairless hamsters near a window or in direct sunlight as they are very susceptible to sunburn.
Sunday, November 15, 2009
Keeping Aquarium Plants


I prefer to pot most of my plants. The method is very simple and does not take a lot of time or effort. First you need some sort of pot. This could be the plastic pots that your garden plants come in, yoghurt containers, the bottom cut off a plastic pop bottle or small clay pots that you can buy at most nurseries. If it is a plastic container, make sure that it is not toxic to your plants or fish. Next get a bucket and add some water to it. Into the bucket add some potting soil. I prefer to use Hillview Potting Soil as I have found that it is pure soil with nothing added. The reason for mixing the soil and water together first is that if you do not saturate the soil and drop the pot into the aquarium, you take the chance of the air in the soil exploding to the surface and making a real mess of the aquarium. Believe me when I say that it can be very frustrating if you rush the job and end up with a big mess. It has happened to me too many time to count. Once the soil is moist (not like soup, more like Play Doh), fill your potting container 2/3rds full of soil. Take your finger and push it into the soil to create a small planting hole. Take your plant and carefully insert the root system into the hole. Carefully fill the hole from the sides, then add aquarium gravel to top up the container. Gently pull the plant upward until the crown of the root is just visible at the gravel surface. I usually have a bucket of aquarium water close by so that I can now submerse the potted plant for a few minutes prior to adding it to the aquarium. This will allow any trapped air to escape and possibly prevent the grief that I was talking about earlier. Now you can place the potted plant into the aquarium and enjoy. The potting soil will give the plant that extra goodness and it shouldn’t be too long before the plant begins to thrive and propagate.
What do I like about potting my plants? I guess the biggest thing is that like most plants, they do better if you leave them alone. Potted plants can be moved around easily without disturbing the root system. I have a Cryptocoryne wendtii that has been potted for almost four years now. It goes through stages of fullness and dying back but always seems to do well. There will come a time very shortly that I will remove the plant, separate the runners and replant it in many other containers. Once the pot becomes root bound (you will see the roots growing upwards out of the pot), the plant needs to be repotted.

Lighting is the most important prerequisite for successful plant growth. I have heard many different opinions on how much light is needed but my rule of thumb is one and a half watts per gallon. Most of my tanks are on home made stands that have the double four-foot fluorescent strip over them. I have two aquariums that are on their own stands, My 180 gallon aquarium has two, double four foot fluorescent strips (160 watts) and my 50 gallon has one, double four foot fluorescent strip (80 watts). I use the regular Cool White tubes, that you can buy relatively inexpensively at most hardware stores, along with the Plant and Aquarium tubes that sell for around $6.00 at the same stores. Most store bought canopies are not capable of providing enough light to keep most aquarium plants healthy so be sure to ask your store dealer for suggestions if keeping plants is your focus.

I have also experimented with different types of lighting. I have had good success with both compact fluorescent bulbs and par 20, 50-watt halogen bulbs. Don’t be afraid to try different light sources. Plants will recover very nicely even if they look rough.
Pruning your plants will also help them to grow healthy and strong. Carefully remove dead or dying leaves and any leaves that are damaged or have holes in them. The plant uses a lot of energy to try and repair these leaves, energy that could be used to produce new, lush growth.
If your goal is to keep a natural aquarium, live plants are a must. If you just want to have a nicely decorated aquarium, live plants can be used with plastic plants and rocks to beautifully aquascape your aquarium. Remember that the key is to be patient and to provide the right conditions for the plants that you are keeping.

Monday, October 12, 2009
Tank Selection
Obviously the most essential piece of equipment there is. There are a variety of size shapes and even materials to choose from. Careful thought is needed before choosing any aquaria.
Material
- All Glass. This is the material most often used. Sheets of glass bonded together by silicone.
Advantages - Relatively cheap, Easy to clean, scratch resistant. Easy to repair.
Disadvantages - Fragile and brittle, which make it easy to crack. The silicone edge can be peeled away and result in a leak. The tank corners are particularly prone to damage. Scratches that do occur cannot be treated. Curved pieces although available are very expensive.
- Plastic. Often used for small cheap tanks.
Advantages - No joints to fail. Very cheap.
Disadvantages - Easily scratched. Easily cracked. Impossible to repair. Usually small in size.
- Acrylic. Although technically a plastic I am treating it as a different option. Used for large and expensive aquaria and other quality aquatic equipment.
Advantages - More clear than glass. Relatively light. Easier to shape. Stronger and more impact resistant than glass. Scratches can be polished out.
Disadvantages - Easily scratched. Very expensive. Can't be repaired.
Shape and Size.
Unless the tank has been measured to fit in an alcove I would suggest that you get the biggest size that you are happy with. Most people exchange their first tank because it is too small to meet their needs. Not only that but large tanks offer a more stable environment than do small ones and believe it or not they are easier to maintain.
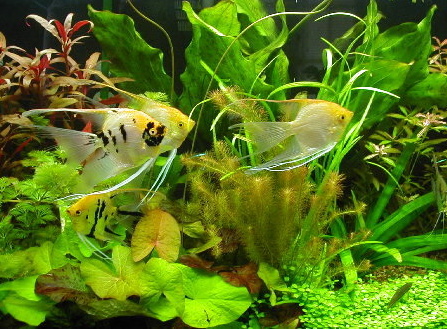
The next deciding factor is what the tank is for. Discus fish and angelfish require a deep tank of at least 15 inches. Fast swimming open water fish requires an aquarium at least 36 inches in length. African cichlids require a lot of rockwork and unless it is built like a wall at the rear of the aquarium (which looks very unnatural and is no use to the fish) a tank at least 18 inches wide will be required. Obviously it goes without saying that if large fish are to be kept then a large tank around will be required.
There are a lot of odd shaped tanks around now too, and whilst these might look trendy they would be a nightmare to landscape and maintain. I have lately seen:
- A 5ft deep hexagonal column 18 inches wide containing angelfish. The problems of maintaining such a tank would be immense. No standard airpump will work at that depth, a temp. gradient would form, cleaning the tank would be a real chore. Hex tanks are bad enough but this with the extra depth, don't do it.
- Two tanks connected together by a broad clear pipe. Quite how the connecting pipe would be kept clean and free from unsightly algae and other dirt is anyone's guess. And unless the two halves were absolutely level there is a chance of a very sudden and catastrophic failure.
- Picture frame tanks, which are no more than 3 inches wide and hang on the wall. These tanks are so small that they could house no more than 4 or 5 small tetras and soon look tatty because they are so impractical.
It is better to stick to the more usual shapes, which are very practical to use and offer great viewing. They can easily be made to any size and if in/on a specially built cabinet they can be made to fit into any room.
If something really special is called for there are bow fronted aquaria, but one big disadvantage is if they break on the front they are uneconomical to repair.
Tips for Aquarium
Opinions vary so much on this subject that it is hard to give a reasonable answer. The Americans for instance have what is known as "cycling", which is the period of time a tank has to remain empty of fish until the good bacteria have established themselves and are controlling the conditions of the water in the tank. Most aquarists in the States recommend a six week waiting period using what they call "A Fishless Cycle". In order for the good bacteria to build up (starting the nitrogen cycle), they need a source of ammonia to feed on. When using this fishless cycle they recommend you add daily doses of pure ammonia to the tank for the bacteria to feed on, which is needed to actually start the nitrogen cycle working.
I would however like to point out that I personally have never used the "Fishless Cycle" method, and never shall. Having to sit and watch an empty tank for weeks on end is not my idea of a pleasurable hobby, so any references to "Cycle" in the following article shall mean the "Nitrogen Cycle", which in simple terms means the time that the system will take to establish a working biological filtration system.
I'm probably an old 'fuddy duddy' having only been involved with fish keeping/breeding/retail/wholesale/ and supply since I was eighteen, (I'm now 62) I've been reading just about anything of interest since I joined various tropical fish forums, and this 'cycling' thing seems to be a major topic. This is a 'new word' in fishkeeping to me, and I suppose also to other 'non American' members. Quite honestly, "do you really need all this to start a successful hobby?"
Let me, as an 'amateur' ichthyologist just run through a 'non chemical, non additive setup' that served myself and many other millions in the hobby successfully for several decades long before all these chemicals and additives became popular.
Preparation was the key, and for us 'oldies' it was a container/s in the back yard that collected clean strained rainwater. This was our source of top-ups, our new water supply, and often our source of live food, if the mossie larva or daphnia got into it. We would set the tank up, fit the u/g filter, and then arrange the pre-washed gravel. If available,we might also use unwashed gravel from another tank and possibly an old filter to speed the process along. Next we would fill the tank with our pre-aged water from our rain tub, bring it up to the right temperature, let it stand a few days, normally three to ensure the heat was constant and there were no probs. In those three days we would arrange plants and rocks, then perhaps introduce a guppy or two. The old pH testing strips from the chemist gave us a quick idea of the pH level, and if it was alkaline we would run a bit of peat in the filter bowl for a day or so to bring the level right. If it was too soft and acid we would add a bit of limestone or coral chips to the box filter and keep an eye on the pH until it was where we wanted it.
Basically that was it, with little or no stress to the fish. Our calculation for fish content was to allow 4 sq. inches of surface area per inch of fish, but with an air supply this could be increased. Water was never added unless it was exactly the same temperature as the water in the tank, and newcomers were never added until they were quarantined for ten days. Plants were meticulously examined for nasties and rinsed in a mild sterilising solution before adding to the tank. All mainly common sense.
Each tank had it own net and tools:
Nothing was ever taken from one to the other. Dipping of fingers or hands from one tank to the other was an absolute sin, and never done. Hands were washed before working on the next tank, and any drips or condensation were wiped away in case it/they dropped from one tank to the next lower one. A single drop of water can transmit a disease from one tank to another so quickly you wouldn't believe.
Water changes:
Water changes, (in my case) were done on a visual basis. If the water has evaporated ½" from its original marked level I would do a 30% water change, never every few days, and never more than perhaps once a month, and always using my aged water in the outside tub/s. Invariably the tanks might have needed a clean up, so in this situation we would siphon the rubbish off the bottom and into a bucket. The water that we siphoned out was dumped and replaced by our aged water. This was then our "water change" and few troubles were encountered. A balanced tank will keep itself free from excess toxins, e.g., the right water conditions, substrate-plants-filtration-and fish, any of which can cause an unbalance.
Water:
Too hard, too soft, too alkaline, too acid - all can be balanced without chemicals.
Substrate/gravel:
Too fine, packs down tight, causing bad circulation, especially with u/g filters, whereas too large a gravel will allow food to reach inaccessible places with dire consequences - food remains uneaten and quickly fouls the tank. Remedy, go for what's right, not what looks pretty.
Slow deterioration of rocks and ornaments:
Badly selected rocks and substrates, (lime-based gravels, sandstones, corals, shells, ornaments), will all change your tank conditions as they slowly leach or dissolve over time. That ornament or substrate may look great, but is it killing your fish?
Hiding Places:
Many types of fish need places to hide, but many things other than plants are usually unsightly. The upturned flower pot of the terra-cotta type can soon become disguised by algae growth and such, but a simple idea for quick camouflage is to spread silicone glue on the item and roll it in some gravel. You can do this with all sorts of things including bits of pipe that might be homes for your nocturnal fish such as some catfish.
Plants:
Too few plants - no hiding places for fragile fish, causing fish to be bullied. Again, find out the likes and dislikes of your plants. For instance, most Crypts prefer dimly lit areas, etc. Shallow gravel will not produce good plants. Bank your gravel to the rear of the tank (at least 3") and plant accordingly, big deep rooted plants to the rear, small types to the front. As with your garden, they need feeding and something to get their roots into. The wastes from your fish may in most cases be enough food, but a good root structure and light are essentials for all plants. A 'Plantab' for aquarium plants slipped under the roots will assist flagging plants. Or try this:
Plant Fertiliser:
Putting fertiliser under plants is a good idea, but unless it is in a tablet form it can be really messy. Try this. Mix a small quantity of organic peat and potting mix (again organic) in a bowl with water until the peat/potting mix becomes fully saturated. Use an ice cube tray and fill with the mixture. Pop it in the freezer till solid. You now have cubes of fertiliser that you can pop under your plants without mess. The ice will melt quickly leaving a nice deposit of fertiliser in the right place.
Weighted Plants:
Instead of attaching lead weights to plants, use a rubber band and a pebble. Place the pebble at the base of the plant and wrap the rubber band around both the pebble and the plant stem. Once buried it will remain unseen, and you have no bits of lead in your tank if the plant breaks free.
Filtration:
NEVER turn your filter or air off for any length of time, especially an undergravel filter. The bacteria buildup will skyrocket causing major probs instantly. Always have some form of air supply running if your tank is in the least bit crowded. Contrary to belief, the bubbles from an airstone don't put oxygen in the water. What the bubbles do is break up and disperse the CO2 that can build up in a tank. Watch for fish lurking near the surface with open mouths, a sure sign of lack of oxygen in the water. Not the Gouramis, Bettas etc, which are surface breathers anyway. For these fish, ensure the surface is scum free by dragging a sheet of paper over the surface of the water occasionally. This will completely remove the thin film that sometimes forms on the surface of the water. Check each day.
Heat Distribution:
Fit your heater as low as possible in your tank and clear of the gravel, and if it is a separate unit from the thermostat place it at the opposite end of the tank. This will prevent cold spots in your tank and provide a constant temperature at all levels. (Heat rises, so if possible fix your heater in a horizontal rather than a vertical position for better heat distribution).
Twin Heaters:
Fitting two heaters in a tank seems a waste, but if you set one to only come on at say 72degF then in the event of a heater failure you won't lose all your fish, and you will always have a spare heater on hand.
Feeding:
Feed half as much as you think your fish need, and if its not consumed in less than five minutes, you are feeding too much. An established tank will sustain your fish for a week or more without food, so don't think you need to feed them every time you pass the tank. "Ooh look, they're all excited at seeing me, they must be hungry…" In goes another feed, the third today. How often have you done or said this?
When to feed:
Never feed at night then turn the lights off and leave the fish in darkness, a major problem. The corys and kuhlis won't mind, but your tank will suffer if the night dwellers don't eat all the remains of the food. Small fish have small mouths, so vary your food type to suit them all. Give them a live food treat now and again, brine shrimp, microworms, grindal worms, white worms, or even a chopped up earthworm if you have big fish. In time you will know their likes and dislikes.
Probs with algae:
Throw the scraper away an get a couple of small plecos. They're fun, hardy, and adore algae.
Snails:
To me they are a damn nuisance, and have no place in a tropical fish tank, but the fish love them if you crunch them up.
Impulse buying of fish:
Fine if you know the fish, and of course is great for the LFS (Local Fish Shop), but can cause many upsets and even tears if you don't read first, so take an hour or so and read all you can before you jump in the deep end.
Lastly:
Read, read, read - the three rules of keeping fish. Learn every possible thing you can about where your fish comes from, its water conditions, its temperature limitations, the food it eats, the species it can live with, its breeding habits, is it a loner or does it school with others, and in general, its likes and dislikes. piranhas and neons have an adipose fin and are distant relatives, but they definitely don't live together, so read and learn all you can BEFORE you add that particular fish to your collection. (No comments on the piranhas please)
It seems a lot to take in all at once, but all this info. is on this site and many others just waiting to be read if you care to read and study it. My philosophy is that "If anyone can teach me something I will listen, should it be a child, or a ninety year old." So I am learning each time I read an article about tropical fish.
We all lose fish at some time or other, and the reasons can be mystifying, but personally I feel that many of the losses are caused by either sheer neglect and not making oneself familiar with the fish BEFORE purchase, along with the possibility that many of the fish were actually poisoned due to the intake of chemicals, incorrect or too many water changes and such.
We can take a pill for a headache or an ailment, but if we take too many of them it will undoubtedly kill us. This will possibly cause a lot of backfire from the clued-up aquarists, but I still feel that if you read up on your fish, get to know its habits and living and water conditions and the neighbours it lives with, then you are well on the way to having a less stressful and very enjoyable hobby. Many newcomers try it once and leave quickly after their first failures. We don't want this to happen to you, so read everything you can about the hobby, consider your situation and your set-up, then, and only then, think (very carefully) about your next purchase.
...Just a note for people who keep goldfish in a heated aquarium:
All fish have the right to a decent life, even goldfish. I myself have culled thousands of fish in my time I suppose, but these were either runts or a defective strain that I would not allow to continue living and breeding for fear they would fill our tanks with some of the oddities I see today. Selective breed by all means, but don't allow your runts and defective breeds to enter the world of the aquarist. (Are there any 'true' strains still out there?). Goldfish are cold water fish, and keeping them at 70F+ degrees will shorten their life span by many years. We had goldfish that lived happily for ten years, outside in a pool that would freeze over in winter with over an inch of ice, but come spring they were always there. The heated tank may also cause undue stress to the fish, who knows. Why not be a good aquarist and introduce some youngster to the hobby by donating your fish to them rather than make the fish suffer all it's life?... but make sure they read a good book about goldfish first.
Tank Set-up and Maintenance
For a while, in my early days of breeding these cichlids, I had a problem with what I thought was overfeeding the fry. I was losing far too many to what appeared to be Malawi bloat. I had an inkling then about the cause, for I knew in my heart that I was not over-feeding. I had observed on a daily, and frequently on an hourly basis that the fry were always feeding on the algae covered rocks and back and side panels.
So out came the microscope, took a scraping off the side panel of one of the tanks, and as I suspected it was teeming with life. Should you ask me to name what I saw then I would fail miserably, but there was one I did recognize and that was a paramecium. Another that stood out was fish-like in appearance, right down to its tail. It was fast moving, and feeding on what appeared to be smaller life forms on the algae. There was one other that drew my attention; it was ladybird-shaped, fast moving, and had what appeared to be two pairs of legs on the sides and what looked like antenna protruding from its head. I might, some would say, know a little about my fish but when it comes to some of their uninvited tank mates… well I've given you a clue so perhaps you could tell me.
Tank maintenance:
Tank maintenance does not start with water changes, period!
Where to start?
You will actually start from day one, and continue for as long as you keep fish in it. What you are striving to do is keep the overall appearance of the tank pleasing to the onlooker, and more essentially a safe and healthy environment for your fish. You will find many reference books on setting up various bio-systems and of course you will choose the one that is applicable to you. One of the first things suggested is the adding of the substrate and that's fine, but to make life easer for yourself in the future try the following. (You will find it a bit of a time-consuming project, but remember you do have four weeks in which to perfect it, and the end result will benefit your water quality and your fishes' health). All of the following, although possible in the past, has now been made more practicable, thanks to the development of the digital camera.
1: Don't add your substrate yet. Take a piece of campers' foam, preferably 12mm or ½ inch thick. This type of foam is what might be called closed face (no surface bubbles). Cut it so that it makes a tight fit and place it at the bottom of the tank. It is important that it is a tight fit. The foam allows the décor to settle as it would on the substrate, thus filling in many of the smaller nooks and crannies that would be potential collectors of detritus and other unwanted debris. Should you have problems with the foam staying in place then several bits of double sided adhesive applied before filling will fix it.
2: Mark, number your decor in a way that will not be affected by water. Add and place your heaviest and any other items that are your first level of décor. Once you are satisfied that all the big rocks, logs - what ever you're using, are in situ, then continue with what else you wish to add. When you're ready continue to step 3. Note: it would be a good idea to take pictures of your set-up, Hence the need to mark or number your items. This shouldn't be a problem, digital cameras being the norm these days.
3: Add water to the required level. Switch on filtration and aeration. No need to turn on heaters at this stage. Be aware that heaters do add to water movement but for the purpose of this exercise can be deemed insignificant.
4: Tank full, flow rate adjusted for direction and turnover, all to your satisfaction? Check now for any debris that has entered the water by way of the décor. Very little debris good? - no, not good - add some more, and leave for 24 hours. Suggestion for debris - anything that sinks but can also be moved by the flow of water or the movement of fish. Important: don't add anything that would or could be detrimental to your filter/s, or more importantly to your fish. One other point - make sure whatever you add can be easily seen against the foam. In fact it would be a good idea to add flake fish food. The benefits of this would be twofold - not only will it show where the grunge will collect, more importantly it can be left in the water as an aid to cycling your water in the first four weeks.
5: Day 2. Check where all the muck has gathered. If it has gathered in easily accessible places, for example, the front of your décor, then that's fine. Any big gaps, holes or crevasses, again fine. What you're really looking for are those tight places where debris has gathered and no matter how hard you try cannot be fully extricated. Remedies; make gaps bigger or smaller; alter the direction of your flow. Take the latter first, for if you get this right the chances are you won't need to move anything. By making all these fine adjustments you will be eliminating all sorts of horrible things that in the long and the short term can only be good for your fish.
6: This is the hard bit and, if you haven't used a camera then you might find it near impossible to do successfully. Providing you haven't used anything that would or could be detrimental to your filter/s, or more importantly to your fish, then there will not be the need to empty the tank of water. Remove all décor and the foam mat and carry out your set-up as per normal using your photographs as a guide.
Regular tank maintenance
Daily checks.
Check the overall general health of the fish, not forgetting the health of an individual fish, such as one that does not show up at feeding times. Carry out ongoing treatments if required. Check temperature, filters functioning correctly, top up, and last but not least, siphon off any unsightly detritus, including any dead or dying plant matter.
Weekly checks.
Water change done with a power vac., or at the least a gravel cleaner. Just removing X percent of the water is simply not good enough. For the cichlids covered by A.R.L.C. I recommend 50% at all times. Remove of algae from the front glass - I recommend that algae growing on the other three glass surfaces be left intact.
Now back to the weekly chores:
Check for water quality, pH, ammonia, nitrite, and nitrate, they are the common ones to watch out for. Others, which are also important, are oxygen, phosphate and copper. Correct readings for all should be strictly observed to uphold the best for your fish. Don't be tempted to clean your filters once a week unless you deem it a necessity. If you only have the one filter then only clean it out fortnightly. Should you have more than one filter, then do one a week. Yellow water I have only one thing to say about: "Improve your filtration", for sure inadequate filters are the cause. Carbon should only be used for the removal of medication after a course of treatment is completed.
Climate Cycling
What a lot…. no, I would go as far as saying what the majority of enthusiasts think and believe is that they should keep their tanks at a constant temperature all year round. Not true or correct for all species of tropical fish, Malawi cichlids being no exception. What is forgotten about is climate cycling - spring, summer, you know how it goes. Inducers, that's what we tropical fish keepers are. Without going into all the inducements we offer our fish, bar one, breeding - something nearly all of us do in the hobby - encourage our fish to procreate. The best way of doing this is to increase the temperature, along with the other inducements. This would in all probability be correct for your species.
Now here are the results of your enticements:
One: Success, they bred, breeding and territorial aggression.
Two: They breed again; breeding and territorial aggression has got worse.
I could go on, but after the third production of fry you should now be thinking of turning the heater down. By the 12th week of doing so the temperature should be in the low seventies and your males should now be in their winter plumage. That's the breeding season over. Three months of respite, time for the males to mellow out, and as a rule revert back to the non-aggressive types they are described as. Time for the females to recuperate and regain stamina. At the end of this three months you need to start bringing the temperature back up again, so by the end of the next twelve weeks it's around the middle seventies. Breeding will take place around this temp., but not at the rate as in the high seventies. Aggression will be mainly territorial.
The next 6 months you have two choices, you can go for the full on breeding, higher aggression state - that's back in the higher seventies, or keep to the middle seventies and still have the males in their best finery but less spawning activity and less bullying. For the community tank I seriously suggest the latter. This cycle should be maintained. It will bring the best out of your fish without overdoing it.
Foot note:
Since reading the two articles on the use of carbon they have changed my thoughts completely. I now have to say carbon used as a filter medium following the guide lines described in the aforementioned articles is the way to go.
Seeding a Tank/Filter
A tank should be "seeded" (inoculated with waste-oxidizing bacteria) when:
l. A remodeled tank is stocked-out.
2. An ammonia build-up occurs when:
- A tank is over-fed, or animals throw up their food.
- Air is left off a tank for too long a time and the biological filter bacteria die off.
- A tank's filter is cleaned too well, discarding too many bacteria.
- An organism gets killed or dies (does not survive shedding, injury, or other causes of death) in a tank.
- Too much city water (high in chlorine and ammonia) is added to a tank killing biological filter.
- A treatment used in tank kills off biological filter.
Excess ammonia should be decreased by water change or addition of AmQuel prior to re- seeding a tank.
Bacteria for seeding a tank can be obtained by:
- Getting a commercial product (Fritz-zyme, other commercial products).
- Backflushing a sand filter.
- Squeezing out sponge filters.
- Siphoning from an undergravel filter.
- Adding coral or gravel from an established filter.
- Adding filter floss from an established filter.
Bacteria should be obtained from a tank with a similar salinity to the tank being seeded. Seed should not be gotten from a tank having recent problems with ammonia, algae, or disease.
If sufficient bacteria are added, a new tank (or re-seeded tank) can be set-up without a three to four week "cycling" process.
Experience plays a great part in ascertaining the amount of debris, etc. needed to seed a tank - a 210 gallon tank needs two to three one-gallon scoops of coral (gravel) from an operating tank in order to properly inoculate it. Spread coral (gravel) evenly over tank bottom.
As the bacteria for a biological filter need food (= waste products) in order to survive and grow do not inoculate a tank and wait one or more days prior to adding organisms.
The Nitrogen Cycle(Fish)
Lets start off really basic. How far you get along into this is up to you.
Fish make Waste - Bacteria get rid of Waste.
Complex enough for you? OK, we can get a little more specific.
Fish produce Ammonia(NH3) as the majority of their waste. Ammonia is toxic to fish so we wouldn't want that to build up in our aquarium. Luckily, there are types of bacteria that use Ammonia as part of their metabolism.
They use up the available Ammonia and convert it to a compound known as Nitrite(NO2). So, all is safe and sound, right?
No. Unfortunately, Nitrite is also very toxic to fish.
Bummer.
Now it happens to be that another type of bacteria come along and use this Nitrite in their metabolism. They scrounge up all the Nitrite they can find and convert it to a compound known as Nitrate(NO3). So all is safe and sound?
YES! Well for the time being...
Nitrate is MUCH less toxic than either Ammonia or Nitrite but should not be allowed to build up. SO...the way to keep the Nitrate level down is...Water Changing.
I knew you didn't want to hear that but that's the way it is. For the majority of aquariums, water changing is just part of the scenery. No way around it. Anyone who tells you otherwise is trying to sell you something (in my not so humble opinion).
Got the concept? Want more specifics? Are you sure? Ok, you asked for it.
When first setting up an aquarium, the tank and all of the folderol inside of it are relatively clean and free of bacteria, especially the kinds that we want. An aquarium takes time to establish a colony of "bugs" to get at the nasty wastes. This is what we call a Bacteria Bed, or also a Bio-Filter
1. A new aquarium gets set up. (assume water etc. is ok)
2. Fish get introduced.
3. Fish get fed ( I would hope).
4. Fish swim happily in enjoyment of their new home.
5. Fish produce waste.
6. Ammonia from the waste starts to build up (TOXIC).
7. Bacteria start growing that use Ammonia.
8. Ammonia level starts to drop as Nitrite level builds (TOXIC).
9. Bacteria start growing that use Nitrite.
10. Nitrite level starts to drop as Nitrate level slowly rises (Much less Toxic)
11. Aquarist (that's you) keeps Nitrate levels in check by doing weekly, partial water changes.
12. Aquarist enjoys years of happy fish keeping and goes on to win the Nobel Prize.
Well, you never know... The point of this is, that the "break in cycle" takes some time to get going. A new tank isn't ready for a full load of fish because the Bio-Filter hasn't built up yet. Go slowly. Good things come to those who wait.
Had enough? Up for more? We can get more technical...ok then.
The types of bacteria that go through this Nitrogen Cycle are known as Aerobic Bacteria. Simply put, this means that they use Oxygen in their daily lives to do all the wonderful things they do. Without Oxygen, they cannot live. (Sound familiar?). They grow on surfaces in the aquarium. On the walls, gravel, decor, filter materials etc.
The best way to get these Aerobic bacteria to grow is to give them plenty of oxygen by having well aerated water AND to give them plenty of places to grow.
For many years, it was thought that Nitrosomonas and Nitrobacter were the primary culprits in this dance of waste management in the aquarium. Recent research by Dr. Tim Hovanec of Aquaria/Marineland in California has shown that we may have been mistaken for all these years.
Now there's lots more that can be said on this subject, but I am tired and I think my Pizza might be here. Also do some web searching. There are many great resources out there. If you really want to rock your world, go out and get "Ecology of the Planted Aquarium" by Diana Walstad. Then take everything I just said and turn it inside out!
Well, not really, but you'll see.
Now go get some fish!
New Aquarium Blues
You have to allow the nitrification or nitrogen cycle to establish itself in your aquarium. In this cycle of events the waste decaying matter is converted to less harmful chemicals which your fish can tolerate and plants can utilize.
The Nitrogen Cycle explained:
When the ammonia levels in your aquarium reach a suitable level (in a few days) nitrosomonas species of bacteria from the air settles in the water and starts to form colonies in your filter or sand, these bacteria convert the ammonia (NH3) to nitrite form (NO2-). At this time the ammonia levels drop to low levels and the nitrite levels starts to increase. The nitrites in the water is also toxic to fish, your aquarium is not ready as yet.. When the nitrite level in the water has reached suitable levels another bacteria of Nitrobacter species starts to establish colonies in your aquarium. These bacteria convert the nitrites to nitrates (NO3-), which are less harmful in small quantities and is absorbed by plants or algae. Now the aquarium is truly ready to host aquatic life. This process takes anywhere from 3 to 6 weeks depending on water temperature. One of the indications of an almost complete cycle is visible algae on the glass. The process looks like this:
Ammonia ->> Nitrite ->> Nitrate
How to speed up the nitrogen cycle:
The beneficial bacteria multiply slowly and to speed up the nitrogen cycle you have to introduce these bacteria into your aquarium in large quantities. The best way to do this is by borrowing some from an aquarium that is already established. An established tank would be one that is at least 3 months old after it has been setup or cleaned. You could
1. Take a cup of sand (with the muck) from an established aquarium and add it to yours. 2. Put a cup of sand from an established aquarium in your filter temporarily. 3. Borrow a filter from an established tank and run it in your tank for a few days. 4. Squeeze the water out of a filter media of an established aquarium. 5. Fill your aquarium with water taken from an established (larger) aquarium.
Taking care of the beneficial bacteria:
NEVER wash and clean an established aquarium. If you have to, try the following procedures. The following steps will save your colony of beneficial bacteria from destruction.
1. Siphon out all the water, filter the water and save for later. 2. Remove the filter and keep filter wet in this water. 3. Do not clean the filter. 4. Remove the sand, rinse, filter the water and save this water as in (1) 5. Now wash tank, substrate (sand), stones etc. 6. After you reset the tank, pour back the water saved in steps 1 & 4. 7. Put back the filter without cleaning. 8. Change water after a few weeks.
NEVER add medication directly to your aquarium unless it is from a reputed manufacturer and the package clearly states that the medication is harmless to filtration bacteria and plants.
NEVER add antibiotics like tetracycline to the aquarium. Treat the fish with antibiotics in a bucket of water. Antibiotic and other Microbicidal chemicals (Betadine) will kill all the beneficial bacteria along with whatever infection you are treating.
NEVER clean out a filter media (sponge) completely. Rinse the filter media gently in clean water to remove surface blockage and re-install. This will retain most of the beneficial bacteria.
NEVER add chlorinated water directly to your aquarium. Chlorine is added to water to kill harmful bacteria; chlorine kills ALL bacteria very effectively. Allow water to sit in bucket with an aerator for some time before adding to your aquarium. Water stored in a sump or overhead tank would have lost all chlorine over time.
And Note:
NEVER add a lot of new fish to your tank in one go. The bacteria colony will not be able to handle the sudden increase in load. Buy and add new fish one pair at a time. Now you know why fish suddenly start dying after you have added a new lot of new fish.
NEVER increase the feed amount to the fish suddenly, the bacteria might not be able to take the extra load of excrement. To prevent overfeeding, when you are leaving town for a few days, put the daily feed amount in small packets with instructions to the person who is looking after your fish.
My fish are already dying, what do I do?
Reduce the levels of these toxic chemicals by a DAILY partial water change. Alternatively you could remove the fish and put them into a large bucket of fresh water immediately. Replace the water in the bucket completely every day till the aquarium has completed the nitrogen cycle.
You can add anti Ammonia compounds like Ammolock, Amquel etc. These compounds lock up the Ammonia and provide complete relief to the fish within an hour.
Your First Aquarium Helps
Your first aquarium should never be an impulse buy. You should be aware that you are about to embark on a mission to provide a suitable world within your home to your new aquatic pets. To understand your responsibility fully, you must realize that you are playing god to these creatures and therefore you are ethically required to understand their environment and requirements fully and to the best of your ability. These creatures that you have decided to make your pets and create a home world for them have no escape except through death. It is a startling reality, which is completely ignored by most.
What are these aquatic requirements you need to fulfill?
Fishes have to be provided with a sufficiently large water body. You can decide the size of the aquarium that your budget allows and buy fish that would be comfortable in that aquarium. Alternatively you could decide the kind of fish that you want to have and buy an aquarium that suits that species. It is cruel to put a large fish into a small aquarium; the unfortunate fish would have limited mobility and low oxygen levels. In the long run such a fish would be unhealthy and as a result may succumb to opportunistic diseases. A large aquarium with few fishes or many small fishes is dreams come true. Ideally plan your aquarium for a small number of fish with a large space to swim around in.
Fishes come from rivers and lakes where there are natural currents constantly refreshing the water. This movement ensures that water is constantly exposed to air. Water from the lower reaches of your aquarium must be brought up to the surface so that fresh oxygen may dissolve in it and carbon dioxide exhaled by the fish may escape into the air. To achieve this in an aquarium you can either use an aerator or a filter-power head. The aerator does more than introducing fresh air bubbles into the water, the air curtain draws up stale water from the lower parts of the aquarium to the surface. Water rides along the water bubbles reaches the top, ripples on the surface increases oxygenation and refreshed water from the surface flows down. Remember that the aerator you select should not be so noisy so as to keep you awake at night. A filter or power head is a better choice. Select one with the flow capacity to suit your aquarium.
Your aquarium needs gravel to simulate nature. The gravel at the bottom helps in many ways. The gravel becomes home to billions of bacteria which help in harmlessly decomposing the fish excreta. This is a very important function to make your aquarium habitable to fish. In water fish excreta breaks down chemically and produces ammonia, which is very toxic to fish. These beneficial bacteria convert ammonia to less harmful nitrates. Without these bacteria your fishes would fall sick within days and eventually die by the damage ammonia does to their gills. The life of these creatures is in your hands and you have to ensure that these useful bacteria are present in your aquarium. Firstly choose gravel which is between 1 and 3 mm. in size, smaller particles will become compacted and larger gravel will make it difficult for plants to root. Make sure the gravel is free of sea shells, gravel prepared from laterite from the coast is ideal. To give your gravel a head start with bacteria, you need to fill your aquarium with water from another aquarium which has been successfully functioning for 3 months or more. You can also take a scoop of gravel from such an aquarium and add it to yours. Another way, take the sponge from an established aquarium and shake it firmly in a mug of water. Allow the mess to settle and add this water to your aquarium.
Most rivers and lakes provide aquatic life with a stable temperature. The temperature may only vary a little in tropical areas, while in other colder regions water might even freeze. Not all fishes have evolved to survive in such stressful climates. Temperatures in small bodies of water like your aquarium might vary quite a lot between day and night. If you plan to keep an aquarium indoors, the temperature may not vary much. If you plan to keep the aquarium outdoors or in an exposed area then temperatures may vary quite a bit. If you suspect that temperatures might vary a lot then you need to reduce these fluctuations by the use of an electric heater. The wattage of the heater will depend on your aquarium size, ask local aquarists for advice. Do not use heaters without automatic temperature control. Remember that glass heaters can break if handled carelessly and broken heaters immersed in water can result in FATAL injuries.
Plants are found in many water bodies, its only natural for you to provide aquatic plants in your aquarium for your pets. Plants provide much needed oxygen during the day. Plants remove nutrients from the water, reducing the buildup of nitrates. Plants provide a hiding place for fishes and break the monotony of an aquascape. Plants need to be selected by their size and suitability to your aquarium size. Some species of fish do not like plants in the aquarium; others constantly dig the gravel pulling out plants. Plants need light to grow, do not skimp on lights. Some species grow well only in bright light. For the first 6 months or more your plants need trace element supplements to do well. Add a micronutrient or trace mix according to directions.
In nature the sun rises and sets with absolute predictability. This sets the biological clock in all living things. It is very important that you provide this cycle to your plants and pets in the aquarium. Unless you plan to keep your aquarium near a well lit window, a light is required. You will have sufficient light if you use Compact Fluorescent lamps (CFL) with good electrical efficiency and keep you power bills low. Common household filament lamps have low light output and high heat radiation and are not suitable for an aquarium. Lamps should be switched on in the morning and switched off 12 hours later. You can invest in a electronic timer if you wish to automate the job. Lights may be fixed in a hood, a cover over the aquarium. When selecting light bulbs for a hood ensure that your fixtures are water proof. You can suspend lights from overhead and leave the aquarium top open. To prevent excessive evaporation, use a glass sheet to cover the top of the aquarium. This sheet is known as a condensation plate. You can use a condensation plate to protect your lighting fixtures from moisture.
In nature there is fresh water flowing in rivers. We cannot provide our home aquatic world with flowing fresh water, waste chemicals accumulate and important chemical elements get depleted so its very important to change some of the water in your aquarium regularly. Since we are driven by a calendar week of 7 days, it's easier to remember change some water weekly. Replace a maximum of 50% your aquarium water every week and add micronutrients or trace mix. If your water supply is chlorinated, you need to allow the chlorine to dissipate by allowing the water to sit in a container for a long time. You can also use chemicals like sodium hyposulphite "Hypo" to bind the chlorine and make it harmless. Chlorine is harmful to fish and it kills the useful bacteria in the aquarium.
Selecting your new fish at the shop is important. Do not buy fish that look like their fins are frayed or look visibly sick. Avoid fish with white spots, fishes with visible injuries or parasites clinging to their bodies. When in doubt avoid buying. Do not pick fish from an aquarium where there are dead fish. Do not buy fish on an impulse. Check if the fish you wish to buy are compatible. Some species are territorial and may become aggressive. You can learn a little more about a fish's nature by spending a little time at the shop observing them. Start with very few fish and increase your population with a few at a time. The aquatic world you have created needs time to adjust to fish load.
Finally your pets need to be fed. Growth of the fish is dependant on the amount of food they get. The more food they get faster they grow and shorter their life span may be. Fish food is available as pellets, flakes and live feed. Select food from reputed manufacturers, use pellets that suit the type of fish you have. Some fish species are bottom feeders, for them you need to use sinking food. They will starve if you feed your pets only floating food. Vary the food a little and give your pets some variety. Feed the fish once or twice a day, use as much as they eat in 5 minutes. Remove all excess uneaten food immediately. If you wish long life for your pets, feed them lightly. Unlike other pets, you can leave fish unfed for many days. If you have to leave town for a few days you need not worry about the fish, they will do nicely for days without being fed. Do not feed them excessively to compensate.
Plan your first aquarium with your family. Encourage your spouse and children to take part in its planning and upkeep. Keep the aquarium where it is out of reach of toddlers and four legged pets! Place the aquarium in a stable and safe place, safe for the family and safe for your fish.
